Microsoft Fabric has a multi-layer security model for managing data access. Security can be set for an entire workspace, for individual items, or through granular permissions in each Fabric engine. In this lab, you secure data using workspace, item access controls, and OneLake data access roles.
Note: To complete the exercises in this lab, you’ll need two users: one user should be assigned the Workspace Admin role, and the other should have the Workspace Viewer role. To assign roles to workspaces, see Give access to your workspace. If you don’t have access to a second account in the same organization, you can still do the exercise as a Workspace Admin and skip the steps done as a Workspace Viewer account, referring to the lab’s screenshots to see what a Workspace Viewer account has access to.
Create a data warehouse
Let’s first create a data warehouse in the workspace you created in previous labs
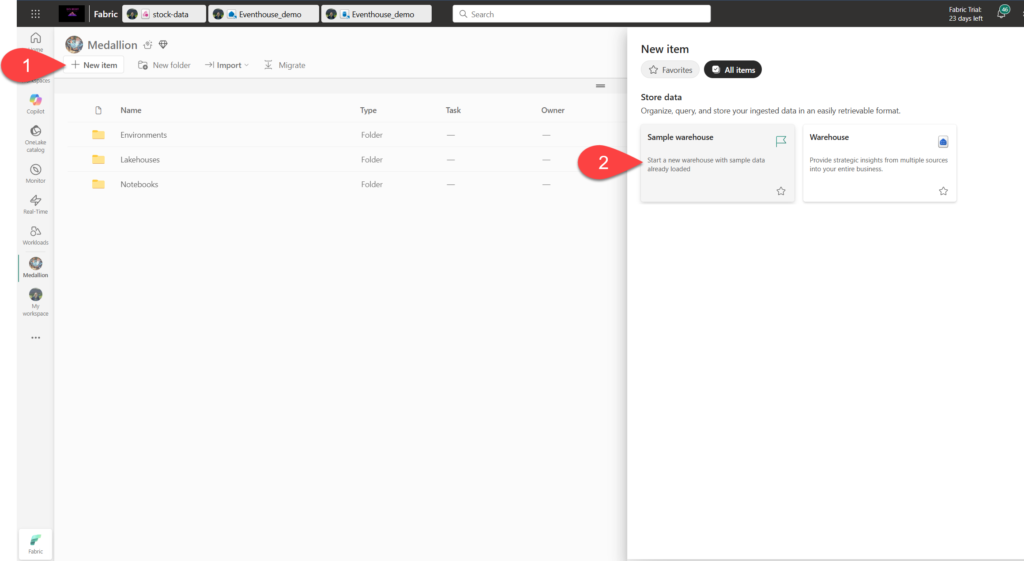
- Click + New Item. On the New item page, under the Store Data section, select Sample warehouse and create a new data warehouse with a name of your choice. After a minute or so, a new warehouse will be created:
Create a lakehouse
Next, create a lakehouse in the same workspace.
- In the menu bar on the left, select Workspaces (the icon looks similar to 🗇).
- Select the workspace you created.
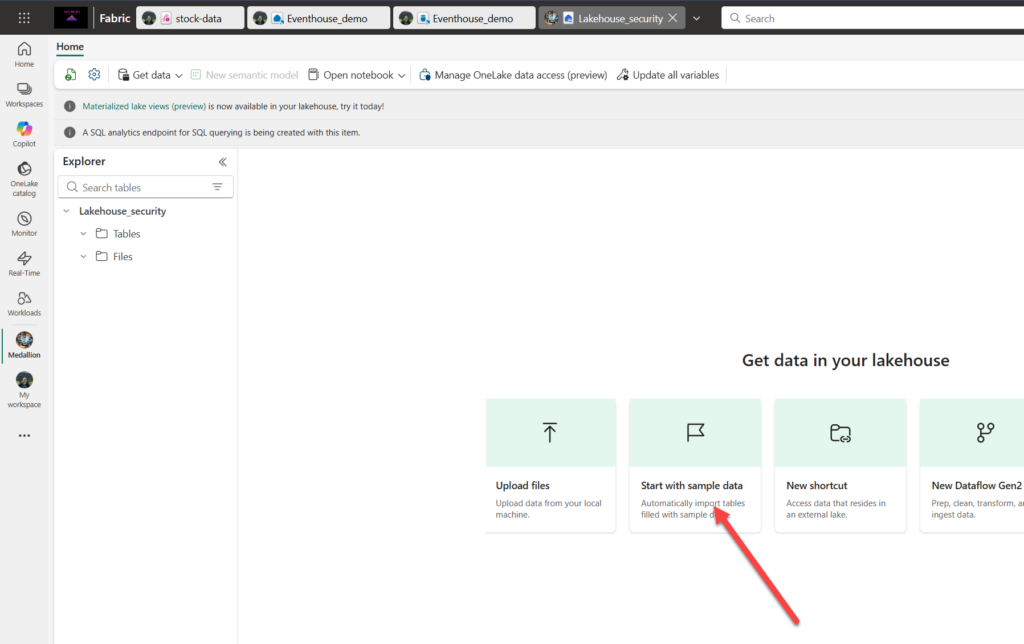
- In the workspace, select the + New Item button and then select Lakehouse. Create a new Lakehouse with the name of your choice. After a minute or so, a new Lakehouse will be created.
- Select the Start with sample data tile and then select the Public holidays sample. After a minute or so, the lakehouse will be populated with data.
Apply workspace access controls
Workspace roles are used to control access to workspaces and the content within them. Workspace roles can be assigned when users need to see all items in a workspace, when they need to manage workspace access, or create new Fabric items, or when they need specific permissions to view, modify, or share content in the workspace.
In this part of the lab, you add a user to a workspace role, apply permissions, and see what is viewable when each set of permissions is applied. You open two browsers and sign in as different users. In one browser, you’ll be a Workspace Admin, and in the other, you’ll sign in as a second, less privileged user. In one browser, the Workspace Admin changes permissions for the second user, and in the second browser, you’re able to see the effects of changing permissions.
- In the menu bar on the left, select Workspaces (the icon looks similar to 🗇).
- Select the workspace you created.
- Select “Manage access at the top of the screen.
Note: You’ll see the user you’re logged, who is a a member of the Workspace Admin role because you created the workspace. No other users are assigned access to the workspace yet.
- Next, you’ll see what a user without permissions on the workspace can view. In your browser, open an InPrivate (or Incognito if you are using Google Chrome) window. In the Microsoft Edge browser, select the ellipse at the top right corner and select New InPrivate Window.
- Enter https://app.fabric.microsoft.com and sign in as the second user you’re using for testing.
- In the bottom left corner of your screen, select Microsoft Fabric and then select Data Warehouse. Next, select Workspaces (the icon looks similar to 🗇).
Note: The second user doesn’t have access to the workspace, so it’s not viewable
- You assign the Workspace Viewer role to the second user and see that the role grants read access to the warehouse in the workspace.
- Return to the browser window where you’re logged in as the Workspace Admin. Ensure you’re still on the page that shows the workspace you created. It should have your new workspace items, and the sample warehouse and lakehouse, listed at the bottom of the page.
- Select Manage access at the top right of the screen.
- Select Add people or groups. Enter the email of the second user you’re testing with. Select Add to assign the user to the workspace Viewer role.
- Return to the InPrivate browser window where you’re logged in as the second user and select the refresh button on the browser to refresh session permissions assigned to the second user.
- Select the Workspaces icon on the left menu bar (the icon looks similar to 🗇) and select the workspace name you created as the Workspace Admin user. The second user can now see all of the items in the workspace because they were assigned the Workspace Viewer role.
- Select the warehouse and open it.
- Select the Date table and wait for the rows to be loaded. You can see the rows because, as a member of the Workspace Viewer role, you have CONNECT and ReadData permission on tables in the warehouse. For more information on permissions granted to the Workspace Viewer role, see Workspace roles.
- Select the Workspaces icon on the left menu bar, then select the lakehouse.
- When the lakehouse opens, click on the dropdown box at the top right corner of the screen that says Lakehouse and select SQL analytics endpoint.
- Select the publicholidays table and wait for the data to be displayed. Data in the lakehouse table is readable from the SQL analytics endpoint because the user is a member of the Workspace Viewer role that grants read permissions on the SQL analytics endpoint.
Apply item access control
Item permissions control access to individual Fabric items within a workspace, like warehouses, lakehouses, and semantic models. In this part of the lab, you remove the Workspace Viewer permissions applied in the previous exercise and then apply item-level permissions on the warehouse so a less privileged user can only view the warehouse data, not the lakehouse data.
- Return to the browser window where you’re logged in as the Workspace Admin. Select Workspaces from the left navigation pane.
- Select the workspace that you created to open it.
- Select Manage access from the top of the screen.
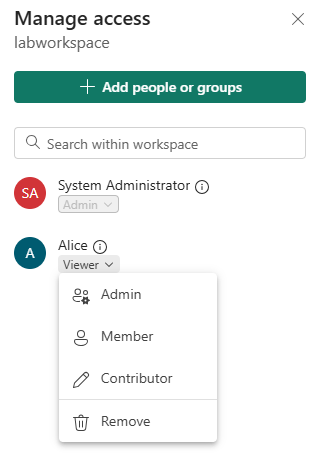
- Select the word Viewer under the name of the second user. On the menu that appears, select Remove.
- Close the Manage access section.
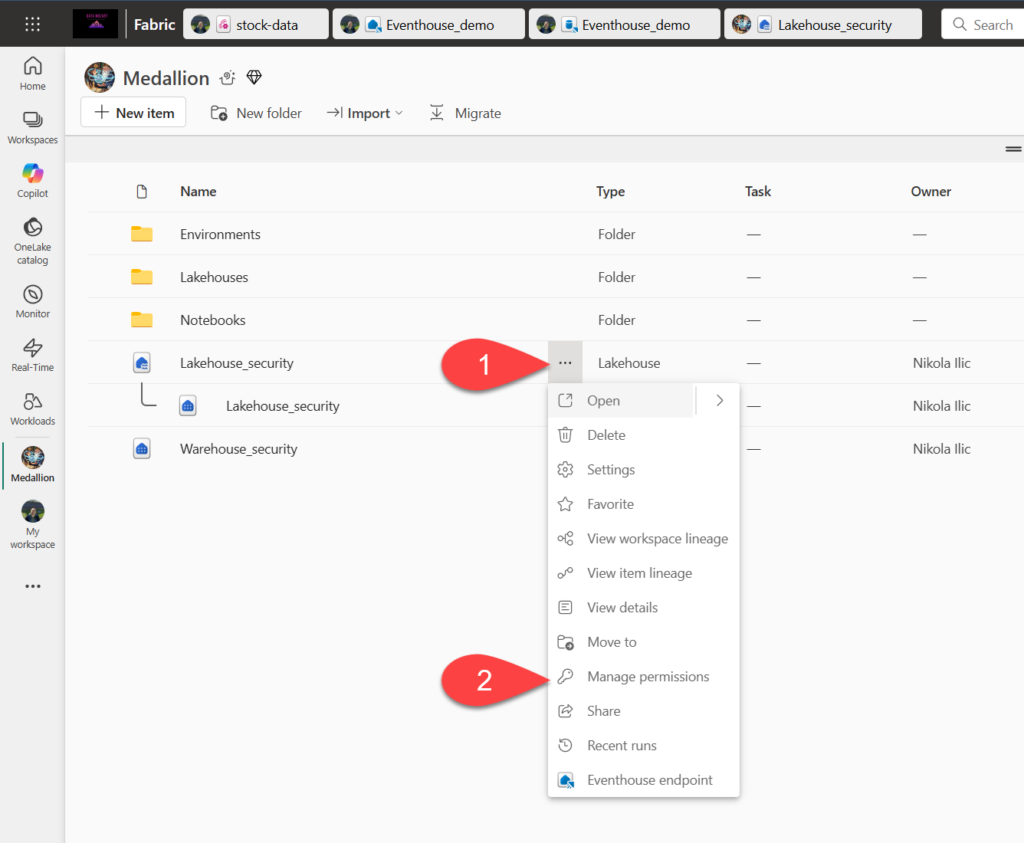
- In the workspace, hover over the name of your warehouse, and an ellipse (…) will appear. Select the ellipse and select Manage permissions
- Select Add user and enter the name of the second user.
- In the box that appears, under Additional permissions, check Read all data using SQL (ReadData) and uncheck all other boxes.
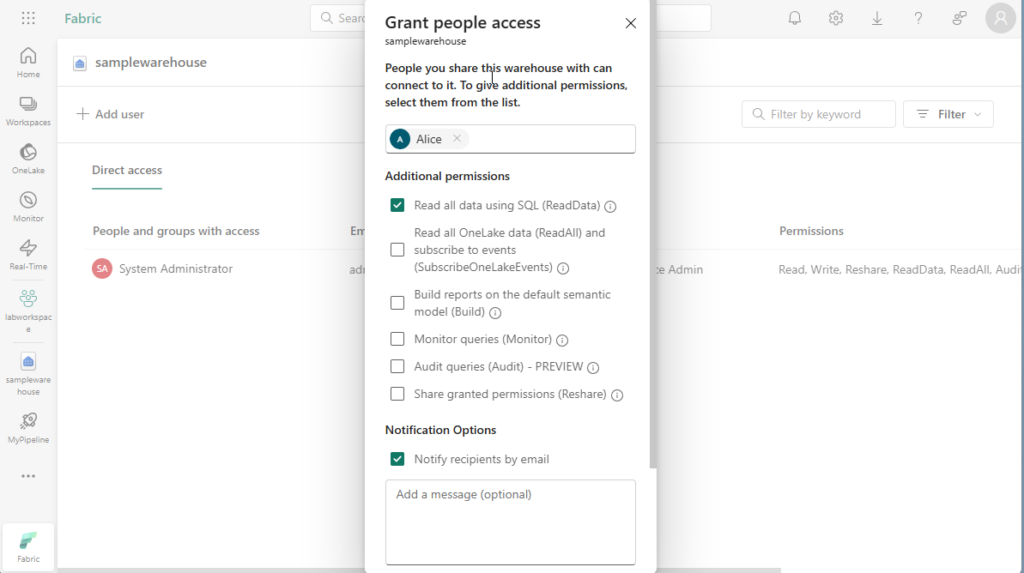
- Select Grant
- Return to the browser window where you’re logged in as the second user. Refresh the browser view.
- The second user no longer has access to the workspace and instead has access to only the warehouse. You can no longer browse workspaces on the left navigation pane to find the warehouse. Select OneLake catalog on the left navigation menu to find the warehouse.
- Select the warehouse. On the screen that appears, select Open from the top menu bar.
- When the warehouse view appears, select the Date table to view table data. The rows are viewable because the user still has read access to the warehouse, because ReadData permissions were applied by using item permissions on the warehouse.
Apply OneLake data access roles in a Lakehouse
OneLake data access roles let you create custom roles within a Lakehouse and grant read permissions to folders you specify. OneLake data access roles will be replaced with the OneLake Security feature.
In this part of the lab, you assign an item permission and create a OneLake data access role and experiment with how they work together to restrict access to data in a Lakehouse.
- Stay in the browser where you’re logged in as the second user.
- Select OneLake catalog on the left navigation bar. The second user doesn’t see the lakehouse.
- Return to the browser where you’re logged in as the Workspace Admin.
- Select Workspaces on the left menu and select your workspace. Hover over the name of the lakehouse.
- Select on the ellipse (…) to the right of the ellipse and select Manage permissions
- On the screen that appears, select Add user.
- Assign the second user to the lakehouse and ensure none of the checkboxes on the Grant People Access window are checked.
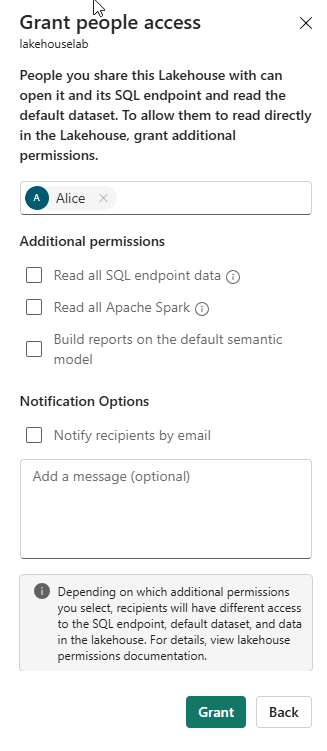
- Select Grant. The second user now has read permissions on the lakehouse. Read permission only allows the user to see metadata for the lakehouse, but not the underlying data. Next, we’ll validate this.
- Return to the browser where you’re logged in as the second user. Refresh the browser.
- Select OneLake in the left navigation pane.
- Select the lakehouse and open it.
- Select Open on the top menu bar. You’re unable to expand the tables or files even though read permission was granted.
- We will now grant the second user access to a specific folder using OneLake data access permissions.
- Return to the browser where you’re logged in as the workspace administrator.
- Select Workspaces from the left navigation bar.
- Select your workspace name.
- Select the lakehouse.
- When the lakehouse opens, select Manage OneLake data access on the top menu bar and enable the feature by selecting the Continue button.
- Select + New on the OneLake security screen that appears.
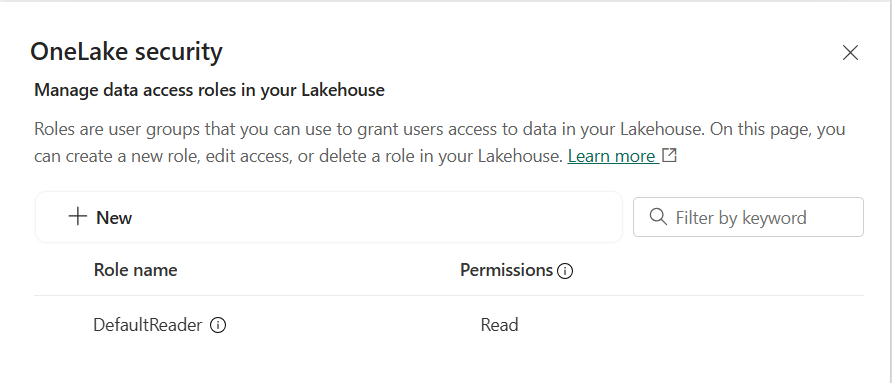
- Create a new role called publicholidays, then select Selected data and Browse Lakehouse. In the new window, select the publicholidays table.
- In the Add members to your role field, add your second user.
- In the Preview role section, confirm that the publicholidays table is added to the Data preview tab with Read permissions, and your second user is added to the Members preview tab. Select Create role.
- Return to the browser where you’re logged in as the second user. Ensure you’re still on the page where the lakehouse is open. Refresh the browser.
- Select the publicholidays table and wait for the data to load. Only the data in the publicholidays table is accessible to the user because the user was assigned to the custom OneLake data access role. The role permits them to see only the data in the publicholidays table, not data in any of the other tables, files, or folders.
Apply granular security to a warehouse
Microsoft Fabric permissions and granular SQL permissions work together to govern Warehouse access and user permissions. In this part of the lab, you’ll secure data using granular permissions, column-level security and row-level security,
Apply row-level security
Row-level security (RLS) can be used to limit access to rows based on the identity, or role of the user executing a query. In this exercise, you restrict access to rows by creating a security policy and a security predicate defined as an inline table-valued function.
- In the warehouse you created in the previous part of the lab, select the New SQL Query dropdown and select New SQL Query.
- Create a table and insert data into it. To implement row-level security in a later step, replace
<username1>@<your_domain>.comwith either a fictitious user name or a real one from your environment (Viewer role), and replace<username2>@<your_domain>.comwith your user name (Admin role).
CREATE TABLE dbo.Sales
(
OrderID INT,
SalesRep VARCHAR(60),
Product VARCHAR(10),
Quantity INT
);
--Populate the table with 6 rows of data, showing 3 orders for each test user.
INSERT dbo.Sales (OrderID, SalesRep, Product, Quantity) VALUES
(1, '<username1>@<your_domain>.com', 'Valve', 5),
(2, '<username1>@<your_domain>.com', 'Wheel', 2),
(3, '<username1>@<your_domain>.com', 'Valve', 4),
(4, '<username2>@<your_domain>.com', 'Bracket', 2),
(5, '<username2>@<your_domain>.com', 'Wheel', 5),
(6, '<username2>@<your_domain>.com', 'Seat', 5);
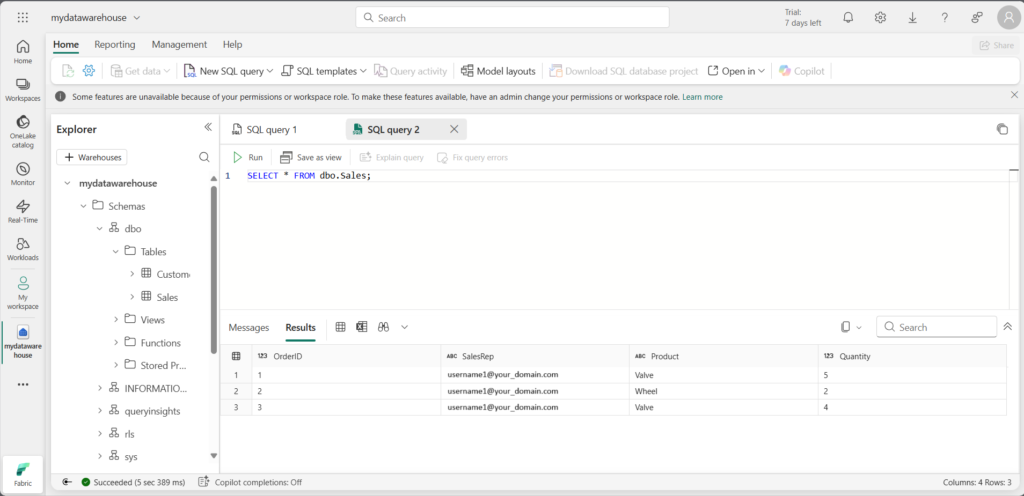
SELECT * FROM dbo.Sales;
- Use the ▷ Run button to run the SQL script, which creates a new table named Sales in the dbo schema of the data warehouse.
- Then, in the Explorer pane, expand Schemas > dbo > Tables and verify that the Sales table has been created.
- Create a new schema, a security predicate defined as a function, and a security policy.
--Create a separate schema to hold the row-level security objects (the predicate function and the security policy)
CREATE SCHEMA rls;
GO

/*Create the security predicate defined as an inline table-valued function.
A predicate evaluates to true (1) or false (0). This security predicate returns 1,
meaning a row is accessible, when a row in the SalesRep column is the same as the user
executing the query.*/
--Create a function to evaluate who is querying the table
CREATE FUNCTION rls.fn_securitypredicate(@SalesRep AS VARCHAR(60))
    RETURNS TABLE
WITH SCHEMABINDING
AS
    RETURN SELECT 1 AS fn_securitypredicate_result
WHERE @SalesRep = USER_NAME();
GO
/*Create a security policy to invoke and enforce the function each time a query is run on the Sales table.
The security policy has a filter predicate that silently filters the rows available to
read operations (SELECT, UPDATE, and DELETE). */
CREATE SECURITY POLICY SalesFilter
ADD FILTER PREDICATE rls.fn_securitypredicate(SalesRep)
ON dbo.Sales
WITH (STATE = ON);
GO
- Use the ▷ Run button to run the SQL script
- Then, in the Explorer pane, expand Schemas > rls > Functions > Table-valued Functions, and verify that the function has been created.
Note: If you connect as the user you replaced <username1>@<your_domain>.com with, and run a SELECT statement on the Sales table, you’ll see the following results for row-level security.
Implement column-level security
Column-level security allows you to designate which users can access specific columns in a table. It’s implemented by issuing a GRANT or DENY statement on a table specifying a list of columns and the user or role that can or cannot read them. To streamline access management, assign permissions to roles rather than individual users. In this exercise, you will create a table, grant access to a subset of columns on the table, and test that restricted columns aren’t viewable by a user other than yourself.
- In the warehouse you created in the earlier exercise, select the New SQL Query dropdown, then select New SQL Query.
- Create a table and insert data into the table.
CREATE TABLE dbo.Orders
(
    OrderID INT,
    CustomerID INT,
    CreditCard VARCHAR(20)
);
INSERT dbo.Orders (OrderID, CustomerID, CreditCard) VALUES
(1234, 5678, '111111111111111'),
(2341, 6785, '222222222222222'),
(3412, 7856, '333333333333333');
SELECT * FROM dbo.Orders;
- Deny permission to view a column in the table. The T-SQL statement prevents
<username1>@<your_domain>.comfrom seeing the CreditCard column in the Orders table. In theDENYstatement, replace<username1>@<your_domain>.comwith the user name of a user who has Viewer permissions on the workspace.
DENY SELECT ON dbo.Orders (CreditCard) TO [<username1>@<your_domain>.com];
Note: If you connect as the user you replaced <username1>@<your_domain>.com with, and run a SELECT statement on the Orders table, you’ll see the following results for column-level security.
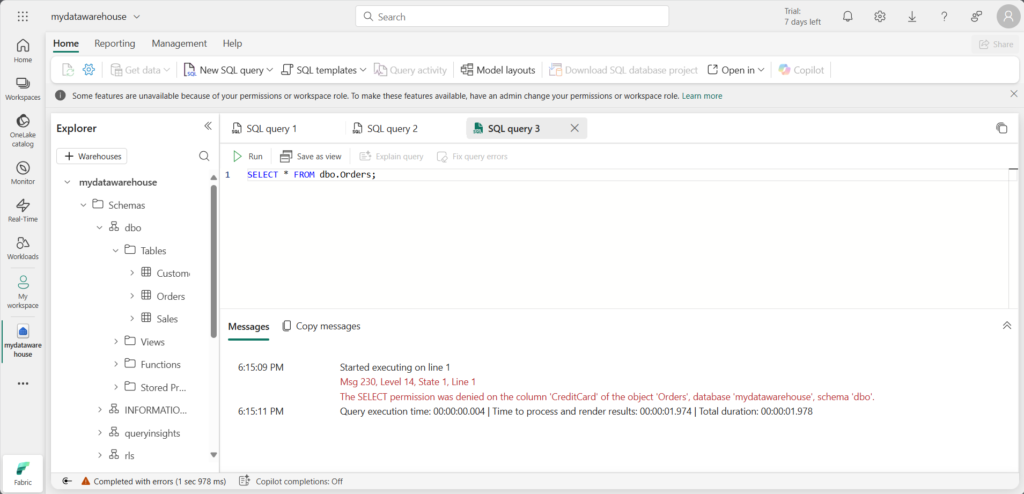
The error shown in the screenshot occurs because access to the CreditCard column has been restricted. If you select only the OrderID and CustomerID columns, the query will execute successfully.
You did a great job in this lab! We learned how to implement security on different levels in Microsoft Fabric, so that your data stays safe and secure in both lakehouse and warehouse.